Targeted at programmers, but all are welcome. Using the PHP language as an example.
After a few words of introduction, it is time to get to the heart of the matter.
Structuring your directory
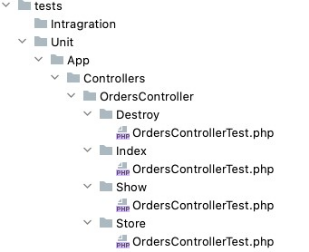
The first element that we encounter when writing automated tests is the directory tree. In our opinion, programmers find navigating through the testing directory easier if the same folder structure is used in the application.
The example directory below shows some automated tests based on an application written using the Laravel framework:
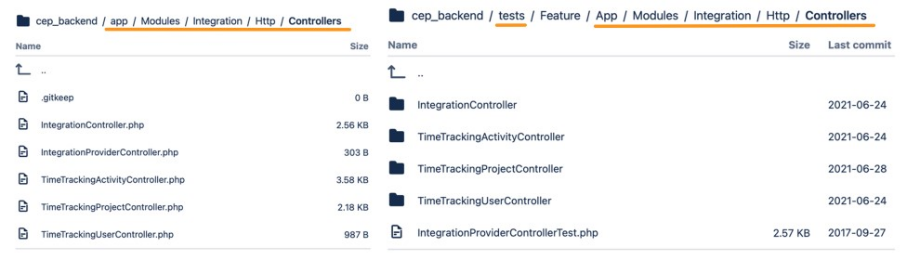
As you can see, the directory containing the tests complement the one used in the application, just like the classes being tested and where they are located in the application.
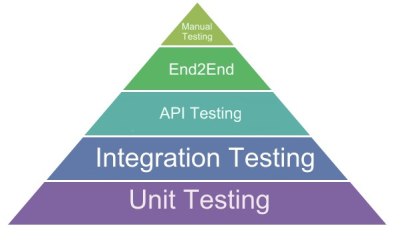
It’s also worth considering separating integration and unit tests into separate folders. As a rule of thumb, unit tests take far less time to complete than integration tests. When writing and developing code, it’s a lot easier for us to initially verify code using unit tests first before following up with integration tests. Another use of having an organized directory is when you want to run all the tests in the system. It’s best to start with unit tests, and only if those pass should the integration tests be run, as the latter takes longer to finish.
Summing all of this up, the root of your directory should look as follows:
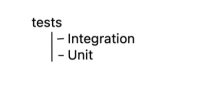
Remember to only include the folders containing the code that will be tested.
Naming conventions and test descriptions
An important thing to keep in mind is naming your test methods correctly.
Let’s start with a simple example showing a class being tested that contains a few methods with only a couple of use cases. In this example, the name of the test method should be the same as the method that is being tested, acting like a prefix. The next part of the name could show the expected result. These two parts form a test method and should be separated with an underscore.
The format should be:
testedMethodName_StateUnderTest_ExpectedBehavior
|
1 2 3 4 5 6 7 8 9 10 11 12 13 14 15 16 17 18 19 20 21 22 23 24 25 26 27 28 29 30 31 |
class OrdersController { public function index(){…}; public function show($id){…}; public function store(OrderParams $params){…}; public function destroy($id){…}; } class OrdersControllerTest() extends TestCase { ... /** * @test */ public function destory_validId_success(){…}; /** * @test */ public function destory_validIdButStateIsBlocked_error(){…}; /** * @test */ public function destory_invalidId_error(){…}; } |
Naming files
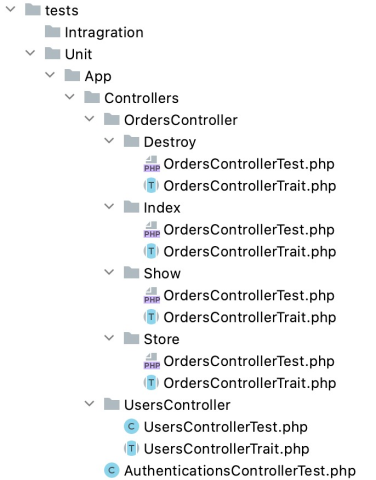
Another example is when a specific method contains multiple combinations, each requiring testing (warning – this is a signal that a forementioned method may not meet the “Single Responsibility” requirement and may need refactoring). Usually occurring when preparing a unit test, the test files should be arranged following this rule: create a folder with the same name as the class being tested, then create the test file that begins with the name of the method that is being tested.
Instead of looking like this:
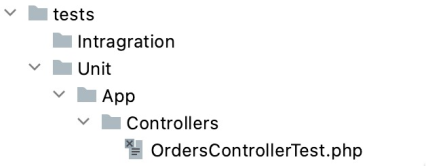
Our folder structure should look like this:
This kind of structure allows you to quickly find related test classes in the source code using your IDE code by searching for the keyword containing the class name followed by the word “Test”, for example: OrdersControllerTest.
Docblock description as Feature-Sceanario-Case
An important aspect of writing automated tests is describing them in such a way that is clear what code is being tested and what the use cases are. UniTree uses a very helpful technique, which is partially consistent with Gherkin. It relies on writing automated tests using @Feature-@Scenario-@Case docblockers, as seen below:
- Feature describes the specific system functionality
- Scenario describes how the functionality will be used
- Case describes the functionality’s specific use cases
The easiest way to explain this is by using system authentication:
- Feature: Authentications
- Scenario: Log in via default form
- Case: invalid password provided – access denied
- Feature: Authentications
- Scenario: Log in via default form
- Case: invalid password provided – access denied
Readable code
When browsing through tests, it’s important that you can tell at a glance what exactly is being tested, what we can expect, and where we can expect the end result. Their contents should be easy enough to read for a child to understand; tests should fully describe why they exist in the simplest way possible without any convoluted explanations. After all, we want to focus on the test’s logic, not the technical details.
Let’s start with splitting code into blocks which you expect to see in tests. Almost every text consists of these three blocks:
- GIVEN – a block that sets up the testing environment, prepares the required parameters and everything else necessary to test a specific method in a given place in the code.
- WHEN – a block showing the called method that we want to test. It should be just one line of code.
- THEN – a block that checks if the end result meets our expectations.
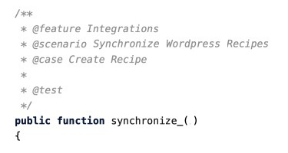
Inserting comments that describe these blocks really helps us understand what is going on in the test and where it is happening:
|
1 2 3 4 5 6 7 8 9 10 11 12 13 14 |
public function synchronize_forNewSynchronization_databaseRowCreated(): void { //GIVEN $synchronizer = $this->newSynchronizer(); //WHEN $result = $synchronizer->synchronize(); //THEN $this->assertDatabaseHas( 'meals', [ 'external_source' => 'WORDPRESS', 'title' => 'How To Make Chicken Fajitas (Easy Fajita Recipe)', ] ); } |
This is even more true when we have more complicated parts of setting up the environment:
|
1 2 3 4 5 6 7 8 9 10 11 12 13 14 15 16 |
public function resolve_floatValue_valuesAreEqual() { // GIVEN $nutritional_model = Mockery::mock(NutritionModel::class); $nutritional_model->shouldReceive(‘getNutritions’)->once(); $nutritional_value = \Mockery::mock(ConstNutrition::class); $nutritional_value->shouldReceive('getValue')->once()->andReturn(§0); // WHEN $summarized_nutrition = $this->makeNutritionBag($nutrition_model); $actual_calories = $summarized_nutrition->calculate(); // THEN $this->assertSame($nutritional_value, $actual_calories); } |
As you can see, it’s now much clearer what is in the test and where, despite the test being quite convoluted. Making tests more readable and “descriptive” is a good practice that you should follow. Extracting code into individual methods – or even better into individual folders – is also helpful in making tests easy to read. So, if you use PHP, consider utilizing Traits.
The example below shows how to make the above code more readable by extracting details into separate methods, ensuring to name them in a way to clearly describe their function:
|
1 2 3 4 5 6 7 8 9 10 11 12 13 14 15 16 17 18 19 20 21 22 23 24 25 26 27 28 29 30 31 32 |
class MealTest { public function resolve_floatValue_valuesAreEqual() { // GIVEN $nutrition_model = $this->mockNutritionModel(); $nutritional_value = $this->mockNutritionValue(); // WHEN $summarized_nutrition = $this->makeNutritionBag($$nutrition_model); $actual_calories = $summarized_nutrition->calculate(); // THEN $this->assertSame($nutritional_value, $actual_calories); } private function mockNutritionModel() { $nutritional_model = Mockery::mock(NutritionModel::class); $nutritional_model->shouldReceive(‘getNutritions’)->once(); return $nutritional_model; } private function mockNutritionValue() { $nutritional_value = Mockery::mock(ConstNutrition::class); $nutritional_value->shouldReceive('getValue')->once()->andReturn(null); return $nutritional_value; } } |
Here is another example of a class where the methods have been extracted into separate traits. The main test class does not distract the programmer and helps the programmer understand what is happening in each test:
|
1 2 3 4 5 6 7 8 9 10 11 12 13 14 15 16 |
class MealTest { public function resolve_floatValue_valuesAreEqual() { // GIVEN $nutrition_model = $this->mockNutritionModel(); $nutritional_value = $this->mockNutritionValue(); // WHEN $summarized_nutrition = $this->makeNutritionBag($$nutrition_model); $actual_calories = $summarized_nutrition->calculate(); // THEN $this->assertSame($nutritional_value, $actual_calories); } } |
Here is a tree structure showing traits being used:
Test independence
When writing code-based tests, it helps to assume that they should be independent of each other. What this means is, when using unit tests, you shouldn’t use the DRY rule between different test classes.
As an example, we mentioned in the previous chapter that in order to extract code into a trait, every test class should have its own trait. Traits should not be able to be used by any other test classes – even if another test class has an identical trait, the code you are extracting should have its own train independent of the rest. After all, test classes may have some changes made to them in the future, so we want to avoid generating potential conflicts between various test classes.
Test uniqueness
Long story short, code-based tests should check for only one concrete use case scenario, albeit this may require writing many similar tests. We can limit code duplication within a test class by using traits for a given class. Uniqueness here means that tests have only one assertion when checking the expected result.
Data providers
Sometimes it may happen that we want to test code under several conditions. When writing tests to check specific functions, making use of data providers is a good idea, as thanks to them you do not have to repeat test code for other parameters. You only have to write only one test method and parameterize it, and the parameter values are injected using a data provider.
|
1 2 3 4 5 6 7 8 9 10 11 12 13 14 15 16 17 18 19 20 21 22 23 24 25 26 27 28 29 30 |
/** * @feature Registration * @scenario Send Freelancer Application FormRegister * @case Require coming Freelancer send Application with CSR * @dataProvider provideCsr * @test */ public function it_required_freelancer_send_application_form_with_csr($state, $csr): void { //...... } public function provideCsr(): array { return [ [ 'state' => 'FL', 'csr' => 'fl-csr', ], [ 'state' => 'AZ', 'csr' => null, ], [ 'state' => 'AZ', 'csr' => 'az-csr', ], ]; } |
Important – in this case, remember to make tests independent of each other and don’t share data providers between any code-based tests. There can be a few exceptions to this, like when we know that a specific data set should always be consistent when there are many system elements present, for example, when handling specific user accounts with unique roles that you have to create and log in to them for testing purposes, and they don’t have a large impact on the testing methodology and test logic (when you can’t prepare the required simulated users in any other way).
Andrzej Fenzel, the Author of UniTree.app
